Cost-Effective Curiosity

In 2009, I got my first “real” computer. Real, as in a gaming PC powerful enough to run AAA content, which at the time was stuff like Call of Duty: Modern Warfare. Or, more humorously, Mass Effect.[1]
Along with that computer, I also got a set of Logitech Z-2300s, a THX-certified 2.1 speaker system, that was one of the better computer speakers you could get on the market for that era.[2]
For $50 second hand, I’d say that’s pretty decent for today’s time. It’s what I use as a ghetto replacement for ‘my’ (now sold) ITG-converted DDR 5th Mix cab at CityHeroes, as I’m not knowledgeable enough in the realm of hardware and electronics to figure out the cause of the cabinet’s speakers not working.

Mentioning the lack of knowledge on hardware and electronics, and those Z-2300s, was no coincidence. Or, perhaps it was.
A Busted Something
Due to that combination, my modestly used speakers had been gathering dust for the last few years because the right channel didn’t work.
We’ve all been there: when your wired earbuds start to only work in one ear, you go and try to wiggle the cable around. Twist it a few times. Put a knot in it in the hopes that it’ll stay in that position. Maybe whip out the electrical tape whilst you’re at it. And usually, that’d solve the problem... until it didn’t any more.
Mine was like that. I’d have to pull the cable a certain way so I could maintain both speakers to work. It did the trick for about a few years.
But after those few years when that fix failed me, I started asking myself: so what’s the problem, actually?
Answering this question, just like with any and all other investigative scenari, boils down to isolation, and figuring what exactly in the whole system was causing the non-working right channel.
How the speakers work
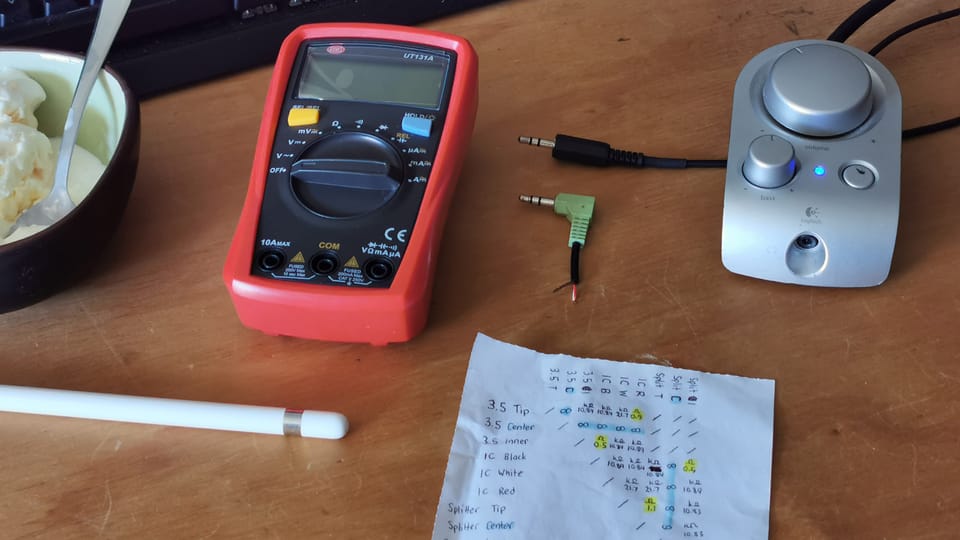
As seen in the feature image above, the Z-2300 has a wired remote that is responsible for most of the action. It contains two cables, one for the audio input (a standard 3.5mm 90° jack, the green one that’s been cut off) and a thicker one (for power, volume and bass control, via a D-sub connector).
The VGA display-reminiscent plug connects to the subwoofer, which is also where the two satellites are connected to as well, via RCA connector.
Satellites?
Is the culprit the satellites? That’s an easy test: just plug both into the left plug on the subwoofer, which we know works. In this case, both satellites did work, so no – it’s not a faulty speaker.
Subwoofer?
Perhaps it’s the subwoofer’s right RCA plug that’s faulty. As much as I didn’t want this to be the case due to how difficult it’d seem to test, I decided to leave this aside and try something else:
Remote?
If we suppose the subwoofer’s right RCA plug was the issue, then that means no remote, working or not, would make the right speaker work. When I was sourcing another second hand set of Z-2300s for the ITG cab, I had an opportunity to try out another remote.
When I plugged that remote into my subwoofer... both satellite speakers worked. Therefore, it’s not a faulty subwoofer; it was likely my own remote.
Replacing the remote
“Okay, great, so we know the remote’s faulty” – and so the first thing that came to mind was to get the whole thing replaced.
The problem is that today (as of writing) is the year 2024. That’s a whole two decades since those speakers were first produced. Of course, such a replacement doesn’t exist, and the only alternative is to look for DIY solutions on eBay or Amazon.
If you were to search up “Z-2300 pod” you’ll find a nice looking replacement being sold for anywhere from $60 to $80 AUD from America. That’s without shipping, by the way; which is another $50 to $70 on top...
Cool.
I decided to spend $50 on a multimeter instead.
Digging deeper into the remote
If I stop to think about it, years ago, I was able to get both speakers working by wiggling the audio cable. So, that must be the problem, and not something on the circuit board of the remote itself. Why did I immediately conclude that replacing the remote was the right thing to do...? Naivety logic, most likely.
With the multimeter, my goal was to test for electrical continuity, to be 100% sure that it was the cable that was problem, and not the circuit board.
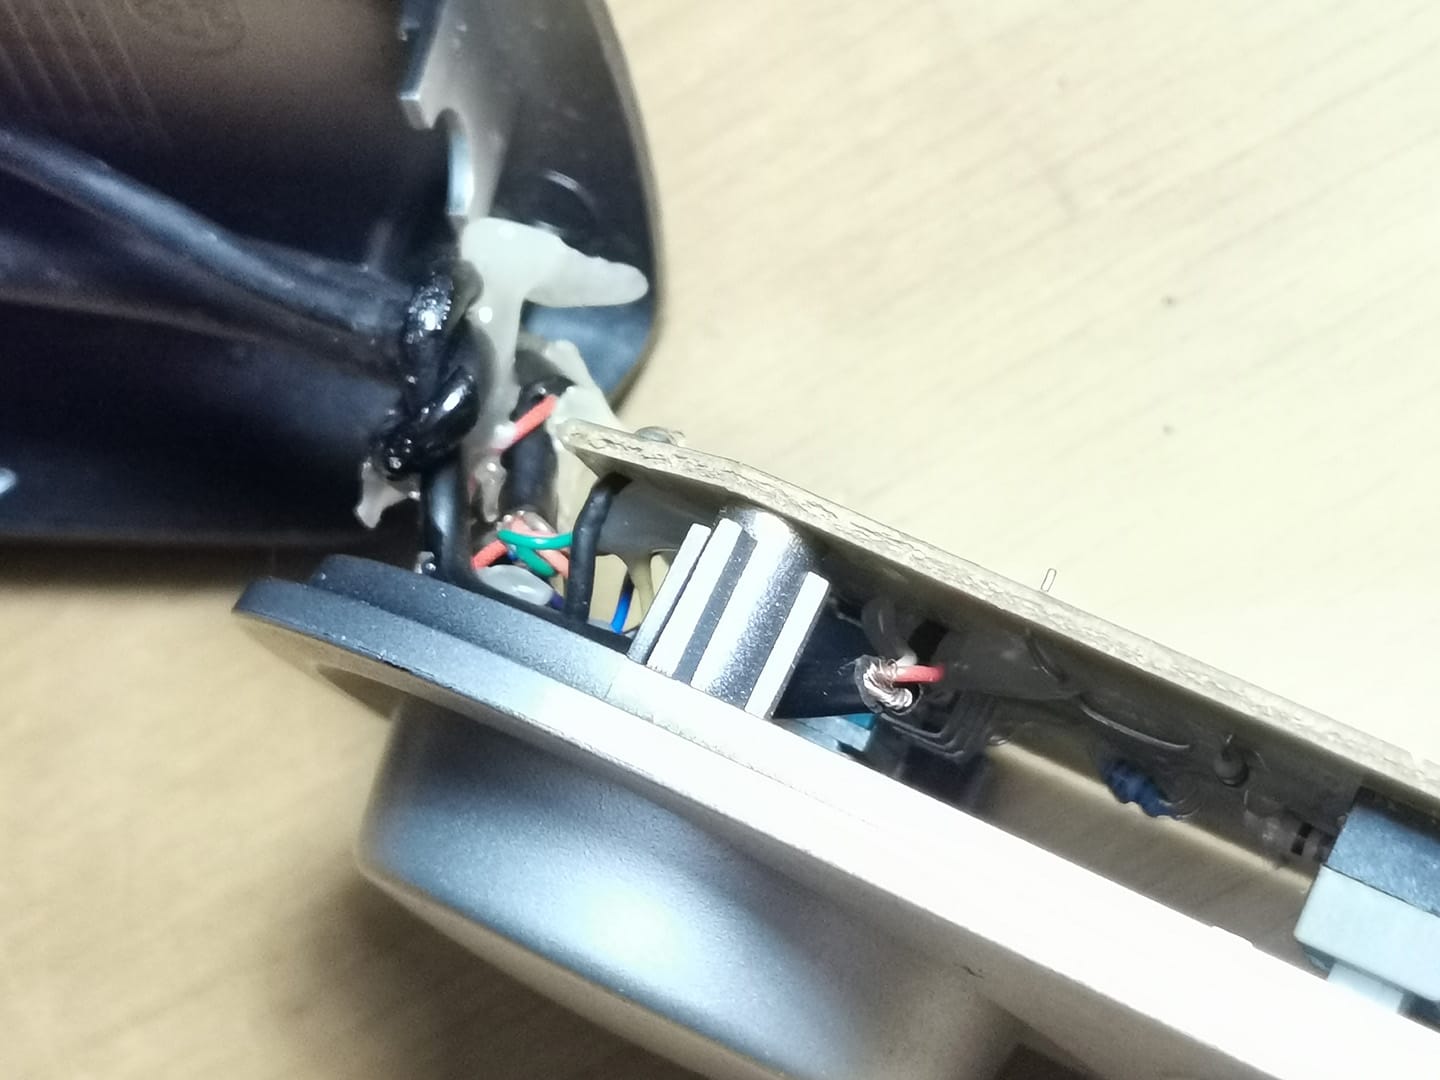
Unscrewing the remote will reveal that the audio cable has three wires coloured red, white, and black (to make clear, in the picture below, it’s the exposed set of wires just to the right of the silver “pillar” holding up the circuit board). Just like how the 3.5mm jack has three contacts, those wires are the two stereo channels and a ground.

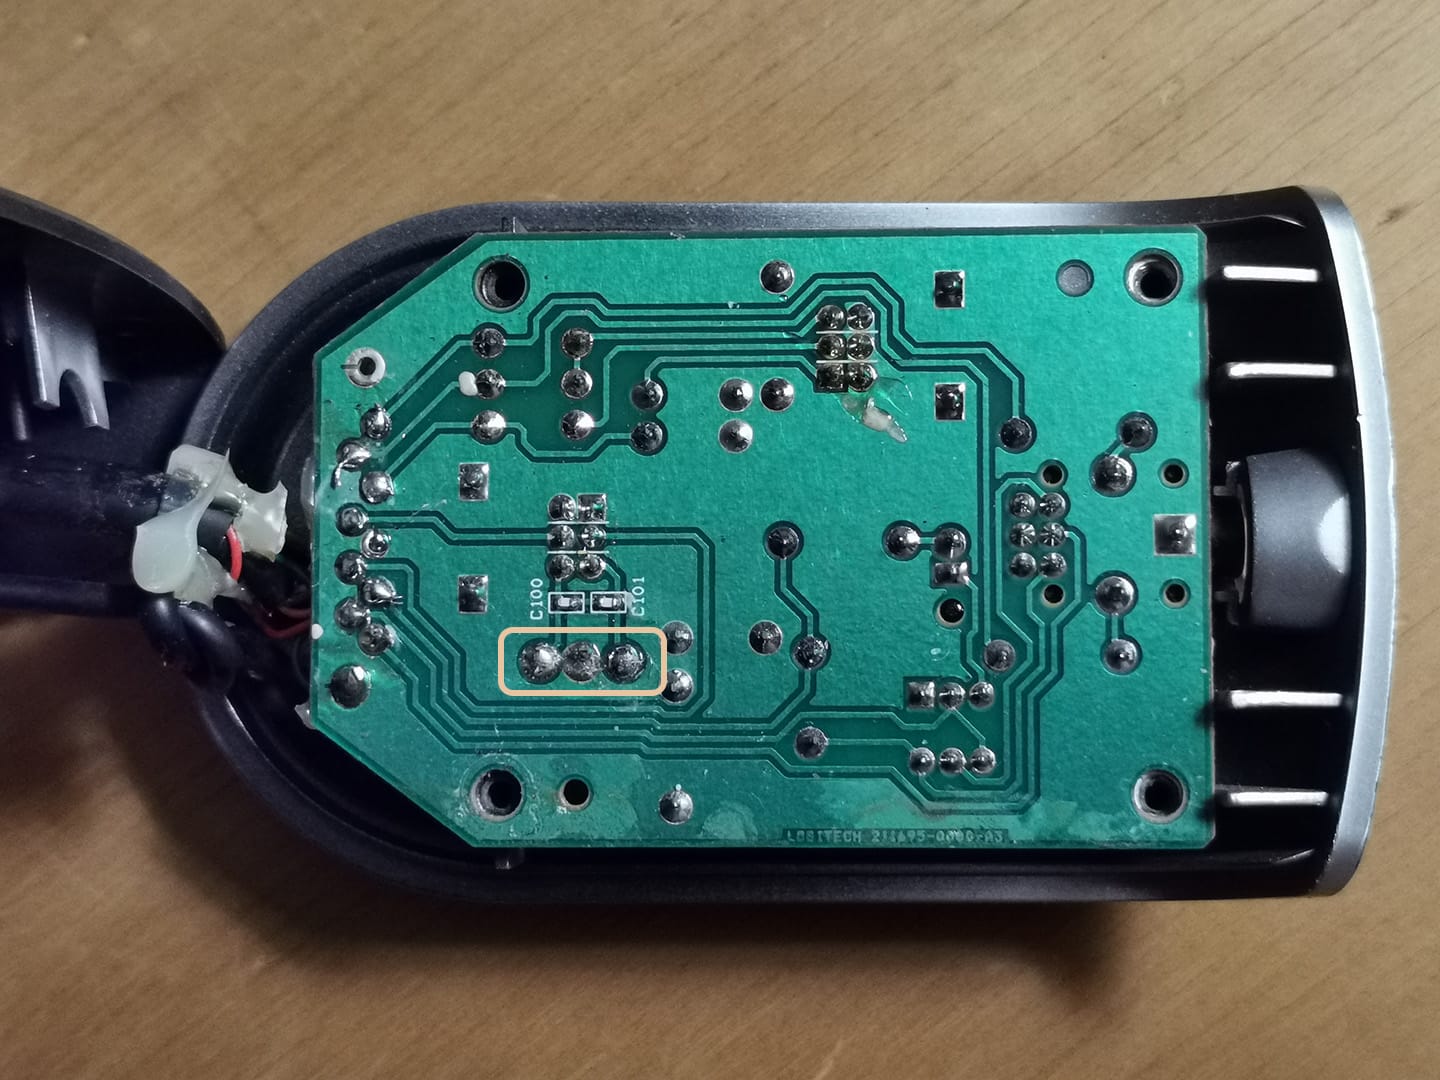
These wires are soldered onto the circuit board (along with hot glue). Still, we can see the order from left to right is white, black, then red. The other side of that circuit board looks like the image below; circled is where they’re connected to.

Based off my extremely limited knowledge of electronics, I can presume the centre is ground since it’s not connected to anything else in the circuit. Also, black is often the standard colouring for ground anyway.
Now we just have to figure out which of red and white is the right channel by touching some metal. Then, we touch some wood and hope something odd shows up with that connection.
Let’s probe
There’s a few things we can check here:
- First, we test the 3.5mm plug itself to ensure everything’s separated and nothing is shorting (which could possibly occur with all that twisting I’ve been doing as a temporary fix, breaking the sheath of the wire, and thus exposing some copper)
- Then we test connectivity with the circuit board (maybe something here busted, like a resistor)
- Also, I plug it into an extension cable (in my case, a splitter) and try that too as a sanity check
Looking up the standard of audio jacks, it seems the tip is always the left channel, the centre ring is right, and the base/sleeve is ground.
We want to test for electrical resistance, which is measured in ohms. When the multimeter probes aren’t touching anything conductive, the value should be infinity. If they touch metal, then the reading should be close to zero. Most multimeters have a continuity check mode that makes a noise when the resistance falls below any value around 200 to 10 ohms (different between each device).
These were my results. Keep in mind that when I plug the 3.5mm jack into the splitter, I can’t probe it (because it’s in something – as mentioned earlier, think of it like an extension cable).
| 3.5mm | Board | Splitter | |||||||
|---|---|---|---|---|---|---|---|---|---|
| T | R | S | W | B | R | T | R | S | |
| 3.5 Tip | — | ∞ | 10.84k | 21.7k | 10.84k | 0.9 | |||
| 3.5 Ring | — | ∞ | ∞ | ∞ | ∞ | ||||
| 3.5 Sleeve | — | 10.84k | 0.5 | 10.89k | |||||
| Board White | — | 10.89k | 21.7k | 21.7k | ∞ | 10.89k | |||
| Board Black | — | 10.84k | 10.84k | ∞ | 0.5 | ||||
| Board Red | — | 1.1 | ∞ | 10.83k | |||||
| Splitter Tip | — | ∞ | 10.83k | ||||||
| Splitter Ring | — | ∞ | |||||||
Based on this, the findings are immediately apparent:
- 3.5mm sleeve = black = ground
- 3.5mm tip = red = left
- Assuming that the 3.5mm jack follows wiring standards
- Also, it’s the channel that does work, and here the wire is conducting
- 3.5mm ring = white = right (faulty)
- By process of elimination
- Also, there’s clear readings of discontinuity across everywhere that involves the ring
- The circuit board is not the issue here because it has non-infinite readings with the other wires
So, I’m pretty sure it’s the plug, or something near it.
Repairing
To replace the plug, I would have to
- Cut off the old plug and strip the cable
- Solder the cables to a new 3.5mm plug
- Wrap a heat shrink tube around it
- Secure the plug in place (crimp?)
- Something else?
Again, if it’s a software problem, I’m always happy to give it a crack. But hardware? Can’t say the same.
Honestly, it would’ve cost me more to get all the consumables, equipment, and time to figure out how to use the tools (for something that I’d probably only use once every several years, mind you) – than if I asked someone to do it for me. I’ve heard there’s a few situations where it’s always better to leave it to an expert. One of them is plumbing; I feel this one is too.
There was a parts store with a technician on-site that was able to do the plug swap as a service. All I had to do was rock up with the remote, pick the plug for them to solder on, and they handled the rest.
The price? $20 for the service, which took about 20 minutes. Plus the plug. (95 cents!)
Totally beats getting a new remote for $150+ and the delivery time, when the old one’s got no issues, huh?
The technician was able to confirm that there was indeed a discontinuity with the white cable at the plug, probably likely due to the nature of the 90° plug. It was the reason why I chose a straight one this time around.
Moment of Truth
Using a Bluetooth transceiver, for the lack of anything more immediately available, I plug the fixed cable in and spun up some music...
And it worked just as new ✨
I’m pretty sure the technician was a lot more confident about the job when I explained the situation as “I’ve done some investigation and I suspect there’s a discontinuity in the white cable, here’s my multimeter readings” and picked the right consumables, rather than “I was wondering if you could fix this device for me, I’m not sure what the problem is” with no additional helpful context.
To be honest, it could be worse than that. Try your best to avoid being one of Those People.
[1] The joke is that ever since I played it on that PC, to this day, I have not finished the game yet. And I probably intend to keep it that way to maintain this trivial fact.
Trust me, it’s a useful, conversational ice-breaker, One Interesting Fact About You.
[2] Key emphasis on “computer” – it’s no audiophile equipment, and the satellite speakers do sound a lot more lacking compared to what my younger self remembered back in high school. However, you certainly couldn’t call it terrible.

