D2 (SMASH! 2023)
FIRST AID (composed by Camille Saint-Saëns)
8 Mar 2023
How do I faithfully capture the essence of a game’s signature gimmick into a 4-panel chart?
About the Song Game
This chart is a dedication to the game that introduced me to Sydney’s rhythm game community back in 2010: DJMAX Technika.
The second instalment in the series brought along a whole bunch of new content to discover in one of the game’s modes, called Technical Mixing – or Club Mixing as it’s named in the second game. It’s most similar to course mode in other games.
Club Mixing
In Club Mixing, you choose three out of six songs from a set list, which have a respective value of 1 through 6; these are summed up and compared to a threshold, which decides the final fourth song. You meet it, you get the “upper” song; if not, you get the “lower” one.
There are two catches that may determine the choice of song order:
- On the nth song/stage, there is a continuation threshold, which is the nth quarter of the life bar. If your current life is below this by the end of the song, you fail the set. Of course, letting the life bar go to all the way to zero results in an immediate fail.
- The life metrics after each stage gets stricter. Life gain is greater and life drops are lesser during the first stage than the final stage, where the gains are practically negligent.
This means, ideally, you want to get the hard content out of the way, allowing you to gain your life back with easier songs on future stages. But, despite the easier life metrics, you had to keep in mind that the first stage still required you to have 75% of the life bar in play by the end of the song.
The Boss Song
In the Super Speed set, the threshold is 13, so there were a few options; though, 13 meant the sixth song (BEE-U-TIFUL by FIRST AID) was compulsory, as 3+4+5 would only sum up to 12. This chart is Area 7 (by SPHAZER, aka M2U) on steroids; they both have a key focus on independence – the separation of hands so that one hits a (typically) constant beat, whilst the other performs a melody.[1]
The lower final stage was the live version of Ask to Wind by Forte Escape. It’s a pretty fast song that goes at 210. But no, we’re here for the real deal: D2. The video below is the Hard chart as seen in the set. Since then, there’s been Normal and Maximum charts – incidentally, the NM chart also has a rhythm separation section.
At that time when Technika 2 had just newly released, this song was pretty memorable for its scroll speed, 356. Put it this way: it was memorable enough that I still recall the number to this day.[2]
In any case, I hope I’ve given you a glimpse of much hype was built around the fastest scrolling chart in the series: hidden, upper boss, in the hardest set (appropriately named) at the time, that clearly targeted the top players looking for a solid challenge. And boy did it deliver.
The Chart
If you have a pretty clear idea of what this song’s all about, I think it’s safe for us to now take a look at my chart. Grab a copy and check it out.
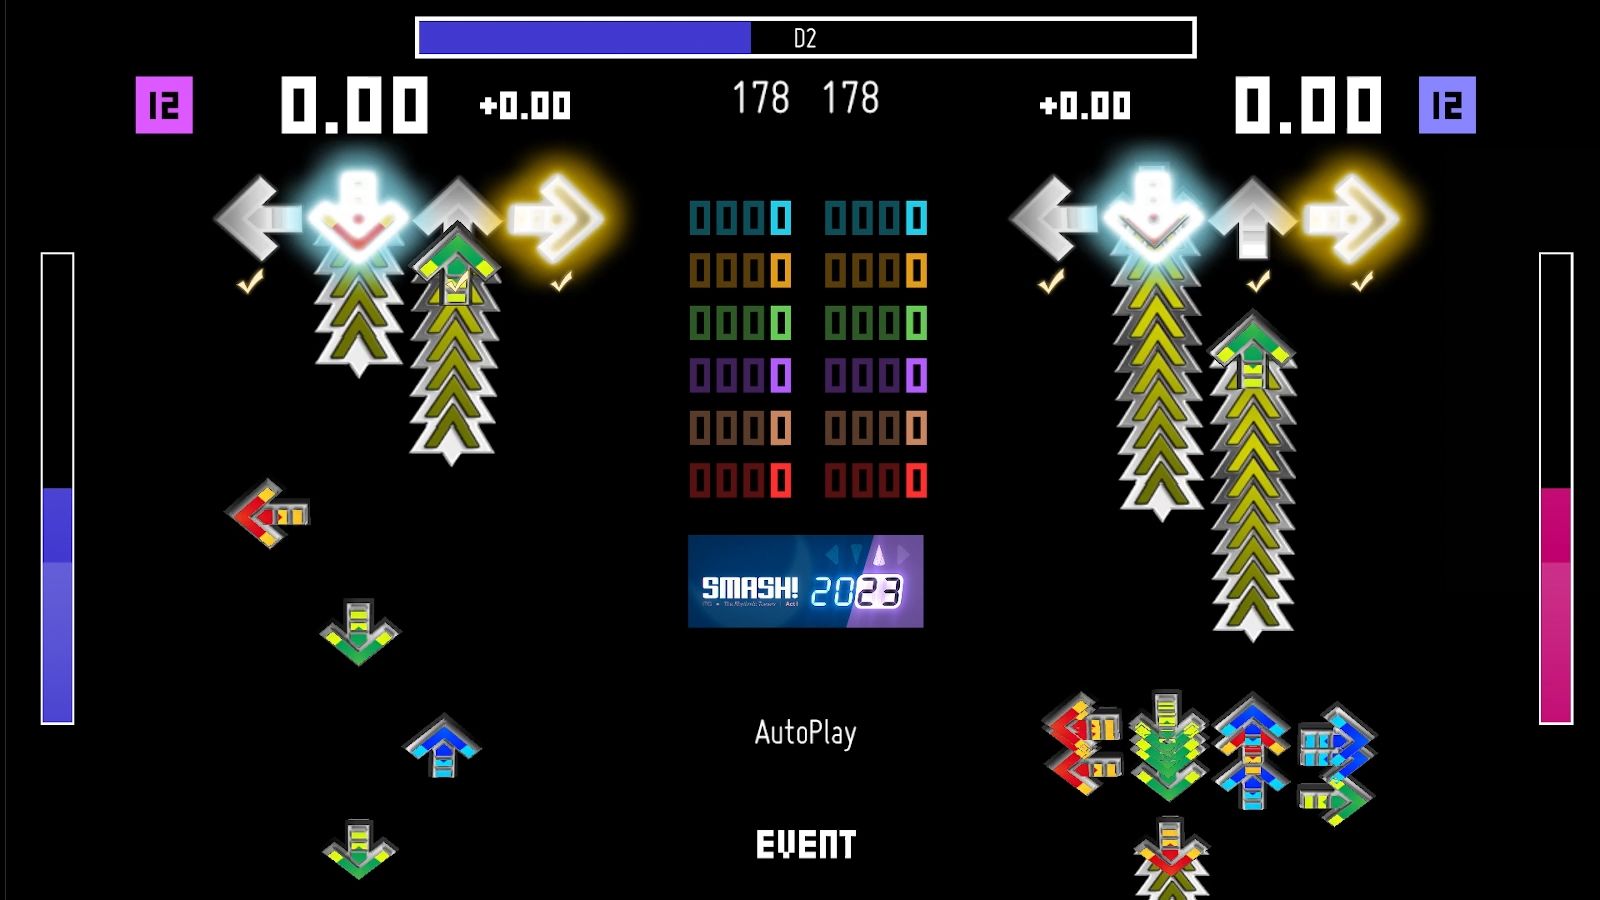
Keep in mind that this was one of the “special aura” songs from SMASH! 2023’s competition, which all had a two-player requirement of some sort.
P1 is to select the hard (first, upper positioned) difficulty, and P2 is to select the expert (second, lower positioned) difficulty.
Or, if you don’t have ready a setup to play simfiles, you can watch the chart instead.
Gotta Go Fast
The first thing you’ll notice is that I’ve set most of the song to have a faster scroll factor (1.5×, to be exact). Of course, this was meant to catch players the first time around to capture the speedy feel of Technika’s chart, but unlike in that game, players can obviously set a slower scroll speed in StepMania to compensate for it.
But that’s not the main point about this chart.
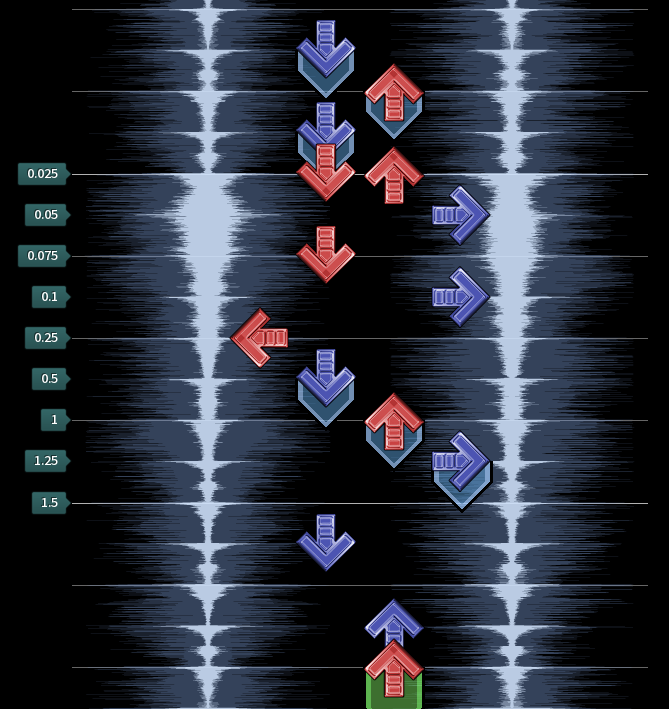
That Slow Bit
Just like on competition day, players had to suss out how to pass this song. So likewise, I’ll let you figure out for a few moments how to play that slow bit yourself. Spoilers below, so after the next paragraph and image, that’s your warning to not look further down!
The hint I provided was watch for the roll notes (the “spiky holds”). If you can’t figure it out, or you just want to know the answer, click the button below to show the explanation.
The idea behind this chart is that players are forced to read both players’ sides at certain periods. One side will always be the “correct” side, i.e. the side where the notes aren’t mushed together.
The roll notes telegraph when to begin switching to the other side.
The reason why the difficulties needed to be assigned to the P1 and P2 sides is solely because P2 has cues to tell the player to look left, i.e. P1. If the difficulties were swapped, the directional cue wouldn’t make sense, unless both players mirrored their charts. (Don’t forget, both charts are exactly the same!)
Either way, in both situations, players need to be reminded to do something, and I presumed enforcing the appropriate difficulty was easier than additionally explaining when to use mirror or not.
Commentary
This chart is by all means a big ask for players who’ve never heard of the song before. The speed changes throughout the 12th sections I thought were intuitive, but naturally, I’ve observed players at SMASH! choke at that point.[3]
I think the biggest challenge in creating this chart was figuring out how to smoothly transition the player to reading the other side. As the chart currently stands (v1.0), I find that to guarantee the ideal non-cluttered reading experience, you already have to be looking at the other side well before you can discern the rolls, especially during the final part.
The inclusion of the rolls on the other side served as both confirmation that the swap was correctly done, and also to make the chart consistent: if the notes were rolls just before the player took their eyes off that side, their memory expects those notes to be rolls as well afterwards.
You may have also noticed that the scroll factors are set in a way such that the acceleration moments are sufficiently smooth. I had to play around with these values so that (a) by the time the player looks to the other side, the packed note effect is well cleared from the playfield and that the upcoming notes look normal, and (b) the roll notes post-swap look perceptibly equidistant with respect to the acceleration as it goes back to the usual speed.[4]
Like mentioned before, the cues for the player to swap sides come a little late, so they may not even notice this in the first place. When I play the chart, at the earliest I tend to swap sides right around the last of the rolls, i.e. 1.25×. This reduction in speed (1.5 → ~1.25 → 1.5) is quite minimal... in theory, so that’s a good thing.
Another feedback point from a player was that the telegraphing roll tails were interfering with the following notes, and he had to switch to a noteskin that better differentiated between hold/rolls and tap notes. In this case, it was DDR’s Note arrows, where the green and gold colours of the hold/rolls are very different from the red/blue.
Overall, there are several areas that could definitely do with a bit of pattern revision to fit the music better (lots of subconsciously written turbo candles, etc). However, with regards to the scroll gimmick sections, these are the main changes I’d consider to improve the quality of play:
- Sections that started with an up or a down sometimes caused me to accidentally resolve the pattern as a crossover. These can be better off as left/rights.
- At the last part of the song, I have inconsistencies with the 5-note melodies. At first, I use a staircase-like pattern (e.g. ↑L ↓ ← ↓ ↑), and then halfway through I switch to a drill-like pattern (e.g. ←L ↓ ← ↓ ↑). When playing, I found that the drills freed up a lot of brain power[5] needed, so that I could instead focus on seeing what the next upcoming notes are supposed to be.
Also, the ↓L ↑ ↓ ↑/← → ← → part just before the long break around halfway through the song was a little mean 🤭
Ultimately, the visual motion of the Technika player rapidly switching between the upper and lower halves of the screen when playing the HD/MX charts was what inspired me to create this chart in the first place. Like most experimental stuff, it seemed like a good idea. But, perhaps this was one of those charts that was better on paper, yet I somehow managed to play around with it and mould it into something that made it suck less in reality.
[1] Area 7 was also a core memory for me in Technika for being the chart that taught me (frustratingly) how to split a rhythm into separate hands. Since then, this inspired a lot of other charts I’d make in the future, such as AImee by C-Show.
In fact, when friends see a repeated note with holds plus a rhythmic section on top, they instantly call it the “Technika Pattern”, or one of those songs from Jubeat (The Wind of Gold, Stellar Wind, Gimme a Big Beat, etc).
[2] Or perhaps it was just that 356 looked oddly familiar due to a certain meme song in DDR...
[3] It’s kind of like expecting somebody who’s never heard of Oshama Scramble!, one of the “national anthems” of maimai, to flawlessly hit this one jack switch section (YouTube video, timestamped; notes 603–607). Not impossible, but very likely to fail out when a life bar’s involved.
[4] Even though the notes are colour coded based on their quantisation, distance between notes still plays a significant role in discerning timing for most players. This is especially the case when the game is one where the note timings aren’t colour coded.
[5] Many would say their initial experience of focusing on reading the chart is indeed like O-oooooooooo AAAAE-A-A-I-A-U- etc. Neon FM demonstrates this nicely in their take on a SDVX classic.
💊